
This article contains information on how to use the Outlook Plugin. We also offer articles on how to download and install the SendThisFile Outlook Plugin and a high-level overview of the plug-in. The Outlook plugin is available for use with all Professional Plans or higher. It is not for use with Free or Starter Plans.
Using the Outlook Plug-In
- Initial Configuration
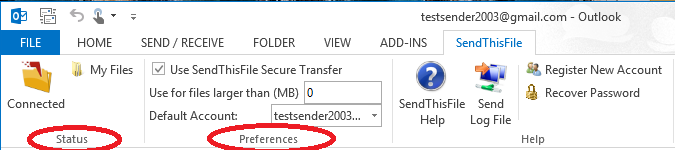
- In the Status Group
- Click on the “Connecting” button (Note: This button/icon will change depending on the connection status – the image above shows how the button will look when successfully connected to the SendThisFile servers)

- Enter account information and click “Sign In”
- Click on the “Connecting” button (Note: This button/icon will change depending on the connection status – the image above shows how the button will look when successfully connected to the SendThisFile servers)
- In the Preferences Group
- Ensure “Use SendThisFile Secure Transfer” is checked if you want to use SendThisFile to transfer files
- Set the minimum attachment size that will utilize the Transfer Manager. This is amount will be for the total size of all attachments
- Set the Default account that will be used to temporarily hold the emails while the files are being uploaded to the SendThisFile servers. DO NOT SELECT YOUR IMAP ACCOUNT. Instead use an account with a local data file like those used for POP email, Exchange, or “Outlook Data File”.
- In the Status Group
- Sending Emails
- If an email has a total attachment size that exceeds the minimum size limit, you will be prompted with the following dialog:

- SendThisFile- Message Transmit Options allow you to modify the options for sending files (if the account holder has them available to the users).

- Use SendThisFile Transfer- will use our service to encrypt your files
- Drop down selection- will show Branded Upload Forms of the user’s credentials used to sign into the Plugin.
- Send Options- are the options that the account holder has set on the form that can be locked, shown, or modified.
- Remember my selection- allows this options box to not prompt every time you send a file, it will remember your selections. You can get this back if you need to make a change once you close Outlook, then re-open it.
- Click OK and the message and file(s) will begin transmitting.
- If an email has a total attachment size that exceeds the minimum size limit, you will be prompted with the following dialog:
- Using the SendThisFile Transfer Manager
- Double click on the SendThisFile “Mailbox” icon in the task menu.
- The File Transfer tab shows the files that are currently being uploaded to the SendThisFile servers.

- The Transfer Status tab shows the status of the files that have been transmitted during the current session.
