This will explain how to customize the “incoming file” notification emails for Business or Enterprise plans.
Basic Set-up
- Click on the Settings tab, and then Add Branded Email tab.
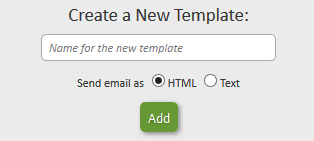
- Enter a name for the template under ‘Create a New Template.’
- Click on the Add button. The template is now visible in the ‘Email templates
 you have already created’ box. Each time you add a ‘Name for the new template’ and click ‘add,’ a new template is added using the existing template as a master.
 - Click ‘edit’ (or on the name of the template) to open the template for editing the name of the template, text, notifications or other settings.
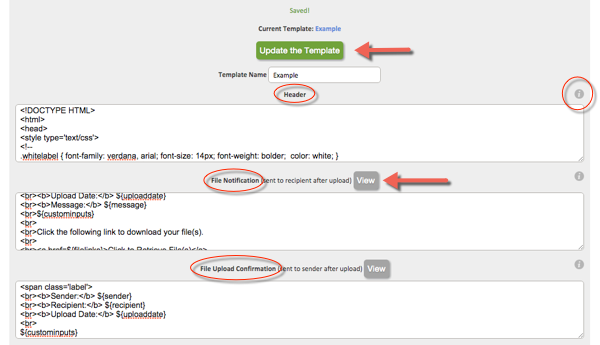
- Be sure to click ‘Update the Template’ after changes are finalized.
Changing the Subject Line Text and Remembering Last Recipient
- Click on the Settings tab, and then on Default Settings.
- Enter the default text you want to appear in the Subject box.
- You can also choose to remember “my last recipient” using the drop down menu.
- Click on update.
To Customize the Notification Emails
- Click on Settings, then on Branded Email Setup. Select the template you would like to customize by clicking its name or on the edit button. Then you can begin making changes to the fields below it.
- For each email template, there are several notification emails that can be customized. Please note that changes made in the top field, “Header” and the last field, “Footer,” will affect ALL notification emails. (Most people use this for their logo or company name.) The fields between these each represent a different notification email.
- Nine notifications can be changed for each template:
- File Notification – the email sent to each of the recipients of a file transfer
- File Upload Confirmation – this email is optionally sent to the person sending the file, upon completion
- File Downloaded – sent to the person that originally sent the file, after it has been downloaded
- Download Limit Reached – sent to the person that originally sent the file when it has been downloaded enough times to reach the maximum allowable download limit
- Verification – sent to users that sign up from your branded form
- Bounce Notification – This email is sent to the person that originally sent the file when the file notification email has bounced
- Expiration Warning – email is sent to the person that originally sent the file when the file is going to expire soon
- User Registration – sent to users that are signed up by administrators of your branded form.
- Password Reset – email is sent to users that have requested a password reset
- To change the text, simply delete the text in the corresponding box and enter your own text. Unless you are familiar with code, be careful to only replace text, not to delete any tags. (Though if you are familiar with writing code, you are free to replace this with your own.)
- Please note, for additional assistance with any of these fields, simply click on the information button on the top right corner of each field. This will bring up a window with information about each notification email.
- To see the changes, first click on the Update the Template button located on the bottom or top of the page, then click on the View button located beside each box.

Updating an Existing, Customized Notification Email
- Click on Settings, then on Branded Email Setup. Select the template by clicking its name or on the edit button. Put the new information in the appropriate box.
- To save the changes, click on the Update the Template button located on the top or bottom of the page.
- To see the changes, click on the View button next to the name of the field you’ve modified.
Removing a Notification Email Template
- Click on Settings, then on Add Branded Email.
- Click on the Remove button located next to the template you want to remove in the “Email templates you have already created” box.

