The ability to customize a Filebox is available to our Business and Enterprise accounts. Follow these steps to customize your Filebox.
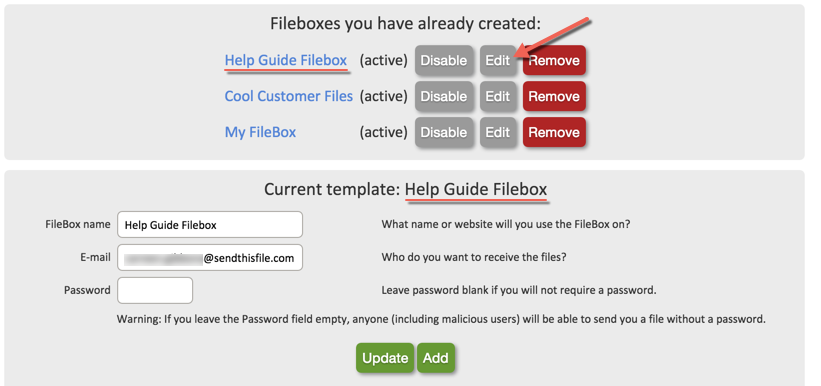
After logging in, click on Filebox in the menu. On the Filebox page, you will see a list of Fileboxes that you have created. If you haven’t created a Filebox yet, you will need to do that first. If you want these customizations to apply to all of your Fileboxes, first create one Filebox, make customizations, then create your additional Fileboxes using the first as a template.
Click on “Edit” next to the name of the Filebox you want to customize. (This should make that Filebox’s name appear after “Current template:”

Then, scroll down to “Filebox Customizations”.
Changing the Prompts and Button Labels
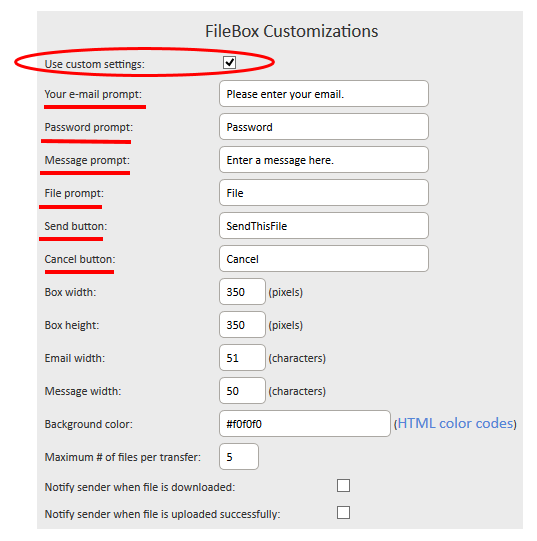
- Click on the Use custom settings box.
- Enter the text in the Your email prompt box that you want to appear inside the box for the email entry in the customized Filebox. This is “prompt” text, so the users of the Filebox will type their email over this text.
- Enter a prompt for the password (if used) in the Password prompt field.
- The text in the Message prompt field will appear inside the message area.
- In the File prompt field, you can give the files a specific name. For example, if your users will always be sending you photos or logos, you could use “Photo” and the resulting Filebox would display, “Photo 1, Photo 2, etc.”
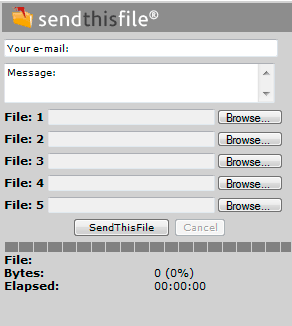
- The text you put in the Send button box will appear on the button used to start the upload (labeled “SendThisFile” in the sample Filebox).
- The text you put in the Cancel button box will appear on the button that cancels an upload.
Sizing the Filebox
- The Box width dimension is in pixels. This value sets the overall width of the Filebox frame. The ideal Filebox width is 292 pixels.
- The Box height dimension is in pixels. This value establishes the overall height of the frame for the customized Filebox. The box height includes the Header and the Footer. The ideal Filebox height is 365 pixels. Use 405 pixels when the Filebox is password protected.
Note: The value in Box height sets the frame size for a finished, customized Filebox. If the value in Box height is not set tall enough to accommodate the Header and the Footer, then the finished Filebox will not display properly, or parts will be missing, so that it will fit within the designated frame height. If the Box height dimension is set too tall, a white background will show above the Header and/or below the Footer to fill in the extra space.
Note: Some browsers (e.g. Internet Explorer, Firefox, Google Chrome, Safari, etc.) will render the Filebox differently. The default Filebox sizes are designed with the best overall appearance and functionality with the most popular browsers. If you change the default sizes we highly recommend testing the Filebox in multiple browsers to look for things like overlapping buttons, fields or text that are cut off, etc.
Size (width) of the Input Boxes
- The Email width: dimension is in characters. This sets the width for the Your Email: box. The ideal setting for the Email width: is 52 characters.
- Message width controls the width of the message area on the finished Filebox. The ideal setting is 50 characters.
Changing Filebox Colors
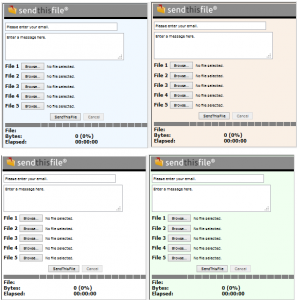
 The Background color is the color of the finished Filebox. The color in the Background color box will replace the gray background area on
  the following sample Filebox.
- Our system recognizes the extended HTML color set. A color chart is available by clicking on the HTML color codes link next to the Background color box. You can use the text or the hex codes in the background color box. When using the hex codes, make sure the code is preceded by the “#” symbol. When entering the color name or hex codes, ensure there are no extra spaces or the color will be incorrect.
Note: For a more streamlined appearance, we recommend that the background color be set to the same color as the page the Filebox resides. We have shown the Filebox with a contrasting color here so that the overall size is obvious for planning purposes.
About the Structure of a SendThisFile Filebox
- The Head is the equivalent of the Head section on an HTML page. This area is for meta tags and other HTML coded set-up instructions. If plain text is placed in this area, it will appear in a white space floating above the header in a finished Filebox.
- The Header is meant to be the highest, visible part of the Filebox. The SendThisFile logo and “Your email:” are in this section in the sample Filebox. The header area takes on the color shown in the background color box.
- The Footer area falls below the buttons. This area is not shown in the sample Filebox. The footer area takes on the color shown in the background color box.
Note: The colored part of the Footer expands to accommodate the text. If the text is lengthy enough to word wrap, or if a series of <br> tags are included, the Footer will expand as needed (frame height permitting) to accommodate the additional lines.
How to add your logo
This can be modified in the Header section (located at the bottom of the page under the Filebox section). You can customize, edit, or remove the logo.
Making It All Happen: The Update Button
- The Update button applies the information in the customization boxes to the HTML code in the copy and paste area, and to the sample Filebox.
- Once you have updated all your changes, copy and paste the code into any page on your website that you would like the Filebox to be embedded.
Updating an Existing, Customized Filebox
- Put the new information in the appropriate box(es).
- Click on the Update button.
- The new text will appear in the Copy and paste box.
- Copy and paste the code onto your website.


